Some people love designer bags or maybe your thing is jewelry; mine is furniture. I have loved furniture for as long as I can remember. Its not really so much about expensive as it is about cool. My favorite thing is probably finding a great quality piece at a dirt cheap price. Something that looks great but cost nothing. I also love to build though. I bought my first set of power tools when I was 21 and have grown the collection considerably since then. I'm probably the only girl who would be thrilled if my husband bought me a pile of wood and a new drill for Christmas!
My two loves came to a wonderful heading when I started seeing some of the gorgeous farm tables people have been building and posting on Pinterest. For weeks I have been contemplating exactly what type of table I wanted to build. I finally decided on a very simple style that uses hair pin legs. I love the hair pin legs because they are so minimalistic and also because using them would save me tons of time on the project!!
I am really excited about this table even though I have no idea where I'm going to put it!! Right now it's just hanging out in the garage until I decide it if will replace my kitchen table, become an actual dining room table, or be sold on Craigslist!
Saturday, March 16, 2013
Tuesday, March 12, 2013
Not Everyone Who Works Gets Fat
When I started working a real 40+ hours a week job I realized quickly that my fitness level was probably going to suffer. I mean that much time sitting on your duff is hard to overcome. Luckily, I've been hugely blessed to not battle weight problems throughout my life. I don't by any means have a perfect figure but I've always been able to create muscle and maintain a decent metabolism. These qualities meant the development of back fat and love handles was a slow progression that I easily justified with thoughts like "well, this is just reality for those of us with office jobs " Or "I'm not always going to look the same as I did in high school." While there is probably some level of truth in these statements, using them to justify my lackluster workout philosophy was definitely the wrong attitude.
Thankfully, I readjusted my thought process thanks to seeing the hard work of some of my closest friends and developed these 4 weekly workouts to try and get back on track. I have to confess here that while I thought these workouts were going to be a breeze, they have actually kicked my but and I've had to concede to only doing one set of the muscle routines.
Regardless though, I'm thrilled to report that after five straight weeks I am definitely seeing results! I feel significantly less "jiggly" and more toned. I've cut about 30 seconds off of my mile time and find the 15 to 20 min runs soo much easier than at first. Many of my measurements have also decreased fractionally and I've lost about 3 pounds. Three pounds might not sound very impressive but combined with the shrinking measurements and more toned appearance I'm completely thrilled! I also managed to GROW my chest measurement (can I get a whoop! For the flat girl!?!?) although I believe it has a good bit to do with developing some back muscle as opposed to spontaneous boob growth.... But still....
I took some great before and after pictures that I was planning on sharing until my husband informed me that I well... Wasn't. Sooooo, this will be a little less dramatic but I'll just have to give some before and after statistics:
Week 1
Weight: 140.6
Booty: 38.75 inches
Waist: 27.75 inches
Chest: 32 inches
Week 5:
Weight: 137.4
Booty: 37.75 inches
Waist: 26.5
Chest: 32.75
The difference:
Weight: - 3.2 lbs
Booty: - 1 inch
Chest: + .75 inches
Wednesday, February 27, 2013
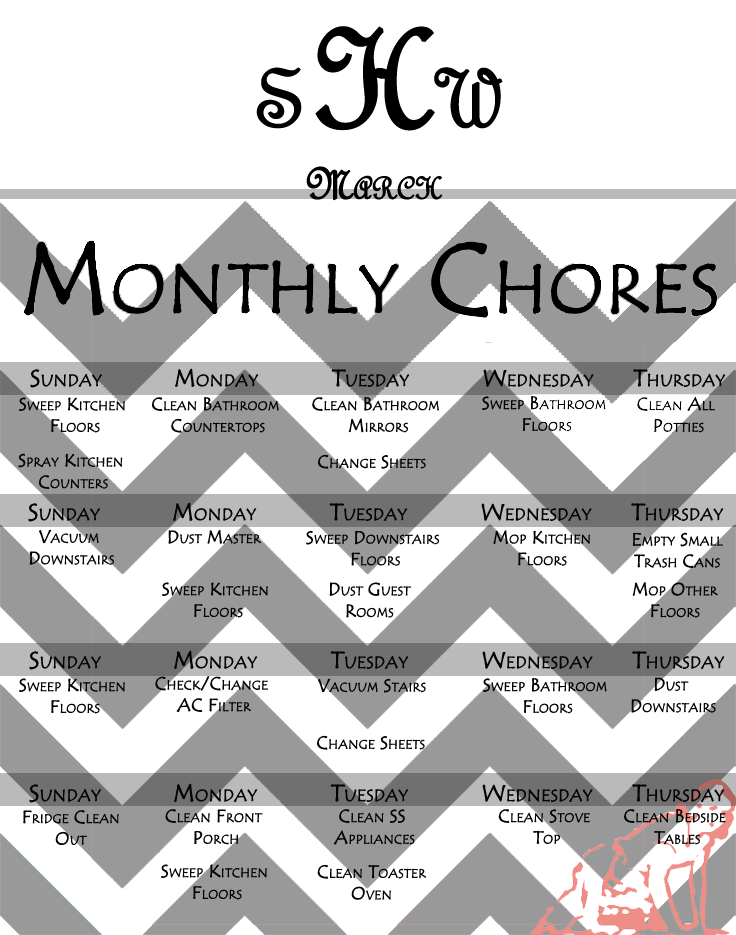
Do Nothing Mode
Reality of my life is if I don't
plan it, it doesn't happen. I have mastered the art of TV sucking my day away.
Worse yet is when I dare to open a book...24 hours later I close it for the
first time. I've never been a "bored" kind of person. I can happily "do
nothing" with the best of them. This quality has its perks for sure but
can also wreak havoc on my life. When I enter sustained periods of "Do
Nothing Mode" my house falls apart and my exercise routine disintegrates.
To combat this I developed a simple, probably inadequate by many people's
standards, monthly cleaning calendar. It is easy enough that I can keep up with
it and thorough enough that my house always looks cared for if not perfectly
clean.
When I originally created it I had
visions of my husband and I sharing the chore load; visions which quickly
disintegrated. Turns out my husband’s standard for "clean" is a lot
different than mine. Dusting downstairs, to him, means wipe the top level of
the coffee table only. How he could neglect to dust say the bottom level of the
coffee table, or the TV and TV console, or hey maybe like the six other
occasional tables in the room is beyond me but it ultimately led to a decision
that I do ALL the inside chores and he does Most of the outside ones. Things
are definitely a little skewed but it keeps the peace so I'm happy.
Anyways, if you are struggling too,
I highly suggest this calendar. It has done wonders for my home!!
Thursday, February 21, 2013
I've Been Chored: Rotten Egg Chicken Style
It happened again this week. I had just started to think maybe it was a stage of my life I had finally grown out of. I have been doing so well with the cleaning/cooking thing that truly I think I got a little cocky. Maybe "being chored" was just a thing of the past?
Not So... Cocky self is back in check. See below for my nasty rotten egg chicken style reminder.
Last week on Wednesday I brought my lunch to work in a fancy little Tupperware container. It was a rosemary lemon chicken dish (recipe here if you're brave enough to try it after this story). We ran out of plastic knives that day at work though and so after scraping a few bites of my chicken breast off with a fork, I gave up and just ate the potatoes. I closed up my Tupperware and set it aside.
Skip ahead five days to Monday, and I see my Tupperware container shoved into the corner of my desk totally forgotten. It was a little before 8 a.m. so I decided I had time to go to the kitchen and empty it out before everyone started coming in. I did expect it to be a slightly unpleasant experience as sealed up Tupperware with food in it is rarely an enjoyable smell.
When I cracked the container and tossed the chicken into the trashcan I was immediately slammed with the foulest rotten egg chicken smell you can imagine. I was a little worried about its intensity, I mean, I was trying to do this under the radar before everyone came in. I decided my best bet was to use dawn on the container, spray some air freshened, and let it dissipate. Surely it would dissipate I told myself.
But it didn't. Back in my office, at least 50 feet away, I realized I could smell it. Not only that, I was hearing an on-going chorus of "what the heck is that?!" At this point, with fear that I might stink up the ENTIRE office rather than just the back half, I tried to nonchalantly make it back to the kitchen to take the trash out and pray that would fix the problem. It almost worked, I was caught red handed by my co-worker but she was cool enough not to tell the whole office how gross I am.
It took about another 2 hours and probably half a can of febreeze, but finally people quit making comments when they come to my side of the building.
Lesson learned: Getting chored is never fun, but its ALOT more embarrassing when it's in front of your co-workers!!
Not So... Cocky self is back in check. See below for my nasty rotten egg chicken style reminder.
Last week on Wednesday I brought my lunch to work in a fancy little Tupperware container. It was a rosemary lemon chicken dish (recipe here if you're brave enough to try it after this story). We ran out of plastic knives that day at work though and so after scraping a few bites of my chicken breast off with a fork, I gave up and just ate the potatoes. I closed up my Tupperware and set it aside.
Skip ahead five days to Monday, and I see my Tupperware container shoved into the corner of my desk totally forgotten. It was a little before 8 a.m. so I decided I had time to go to the kitchen and empty it out before everyone started coming in. I did expect it to be a slightly unpleasant experience as sealed up Tupperware with food in it is rarely an enjoyable smell.
When I cracked the container and tossed the chicken into the trashcan I was immediately slammed with the foulest rotten egg chicken smell you can imagine. I was a little worried about its intensity, I mean, I was trying to do this under the radar before everyone came in. I decided my best bet was to use dawn on the container, spray some air freshened, and let it dissipate. Surely it would dissipate I told myself.
But it didn't. Back in my office, at least 50 feet away, I realized I could smell it. Not only that, I was hearing an on-going chorus of "what the heck is that?!" At this point, with fear that I might stink up the ENTIRE office rather than just the back half, I tried to nonchalantly make it back to the kitchen to take the trash out and pray that would fix the problem. It almost worked, I was caught red handed by my co-worker but she was cool enough not to tell the whole office how gross I am.
It took about another 2 hours and probably half a can of febreeze, but finally people quit making comments when they come to my side of the building.
Lesson learned: Getting chored is never fun, but its ALOT more embarrassing when it's in front of your co-workers!!
Skillet rosemary Chicken
Ingredients:
3/4 pound small red-skinned potatoes, halved, or quartered if large
Kosher salt
2 sprigs fresh rosemary, plus 1 tablespoon leaves
1 clove garlic, smashed
Pinch of red pepper flakes
Juice of 2 lemons (squeezed halves reserved)
2 tablespoons extra-virgin olive oil
4 skin-on, bone-in chicken breasts (6 to 8 ounces each) (I use boneless, skinless instead)
10 ounces cremini mushrooms, halved
Directions:
Preheat the oven to 450. Cover the potatoes with cold water in a saucepan and salt the water. Bring to a boil over medium-high heat and cook until tender, about 8 minutes; drain and set aside.
Pile the rosemary leaves, garlic, 2 teaspoons salt and the red pepper flakes on a cutting board, then mince and mash into a paste using a large knife. Transfer the paste to a bowl. Stir in the juice of 1 lemon and the olive oil. Add the chicken and turn to coat.
Heat a large cast-iron skillet (like this one) over medium-high heat. Add the chicken, skin-side down, cover and cook until the skin browns, about 5 minutes. Turn the chicken; add the mushrooms and potatoes to the skillet and drizzle with the juice of the remaining lemon.
Add the rosemary sprigs and the squeezed lemon halves to the skillet; transfer to the oven and roast, uncovered, until the chicken is cooked through and the skin is crisp, 20 to 25 minutes.
Source: http://www.foodnetwork.com/recipes/food-network-kitchens/skillet-rosemary-chicken-recipe/index.html
Sunday, February 17, 2013
Easy Way to Hang a Headboard
My husband and I finally decided to build a headboard this morning after I ran across this headboard tutorial that used batting instead of super expensive foam. See tutorial here. It was a really great tutorial but I couldn't mount my headboard the way they did.
I did a quick google search for "how to hang a headboard" and found this picture.
I really liked the idea but when I ran up to Home Depot I found out their similar French cleat system cost $arc 15 which would kill my project budget. Instead, I came up with this super easy and cheap system...stem

Basically, we just cut two pieces of 3/4" wood at 45 degree angles on one side. Then we attached one to the wall, and one to the headboard. We were worried on how secure it would be and I can honestly say the headboard won't budge. It seems like it is sucked to the wall.
The system worked especially well with our headboard which had an edge piece like a tray. This allowed us to mount the 45 degree piece within the "tray" and end up with the headboard flush against the wall.
I did a quick google search for "how to hang a headboard" and found this picture.

I really liked the idea but when I ran up to Home Depot I found out their similar French cleat system cost $arc 15 which would kill my project budget. Instead, I came up with this super easy and cheap system...stem

Basically, we just cut two pieces of 3/4" wood at 45 degree angles on one side. Then we attached one to the wall, and one to the headboard. We were worried on how secure it would be and I can honestly say the headboard won't budge. It seems like it is sucked to the wall.
The system worked especially well with our headboard which had an edge piece like a tray. This allowed us to mount the 45 degree piece within the "tray" and end up with the headboard flush against the wall.
Subscribe to:
Posts (Atom)